Vex Programmming Notes
Quicklinks
Code Examples
Vex Doccumentation (External link)
Contents
- Initiating Motors
- Initiating Controllers
- Spinning Motors
- Stopping Motors
- Wait
- Printing
- Set Cursor
- New Line
- Clear Line
- New Line
- Controller Input
- Controller Vibration
- Motor Settings
- Motor Data
- Digital Out
Initiating Motors
Motors are initiated in the following format:
motor motorname = motor(PORT1, gearSetting::ratio18_1,false);
In the motor() function there are 3 arguments.
- port number
- The gear setting
| Gear | Code | Description |
|---|---|---|
| 6:1 | |
(600 RPM) turbo motor |
| 18:1 | |
(200 RPM) speed motor |
| 36:1 | |
(100 RPM) strength motor |
- Wheather to reverse the motors
true(will reverse)false(will not reverse)
Initiating Controllers
Controllers are initiated in the following format:
controller controllername1 = controller(primary);
controller controllername2 = controller(partner);
In the controller() function there is 1 argument.
- The controller types
- primary (main controller or otherwise known as Horizontal controller)
- partner (secondary controller or otherwise known as Vertical controller)
Spinning Motors
You can spin motors in the following format:
motorname.spin(directionType::fwd,100,velocityUnits::pct);
In the motor.spin() function there are 3 arguments.
- The direction
directionType::fwd(Forward)directionType::rev(Revese/Backward)
- Speed
- Any value between -100 to 100 (negative numbers go backwards)
- The mesurement used in speed
velocityUnits::pct(Percentage)velocityUnits::rpm(Rotations Per Minute)velocityUnits::dps(Degrees Per Second)
Note:
- In the second arguement, Speed, if number exceeds the maximum capability of the motor (E.g. 110%), it will only go at the maximum speed (E.g, 100%).
- Add
controlername1.axis1.value()in the second arguement, Speed, if you want the motor to spin according to the movement of the joystick on the controller.axis1being the axis you want to control with the motor andcontrolername1being the name of the controller you initialised it with.
Stopping Motors
If your motor spins indefinitely due to functions like motor.spin(directionType::fwd), you will eventually need the motor to stop. You can do so like this:
motor.stop();
Alternatively, you can also specify the way you want it to stop:
motor1.stop(brakeType::coast);
motor2.stop(brakeType::brake);
motor3.stop(brakeType::hold);
motor.stop() takes 1 optional argument:
brakeType(How you want the motor to stop. There are 3 types ofbrakeType:
| brakeType | Description |
|---|---|
|
Motor stop accelerating, slowly coming to a stop. Motor is still movable by external forces. |
|
Stops motor completely. Does not return to original position (when braking was called) if moved. |
|
Stops motor completely and returns to original position (when braking was called) if moved. |
Wait
You can add a wait block using the following format:
task::sleep(Time);
In the sleep() function there is 1 argument.
- Time in miliseconds
- Any number
- Any number
Printing
Printing things on the controllers and brains help make it easier to test things out.
Both functions below take in 1 argument:
- Message
- As a ‘Const Char’ (a.k.a String) format
Brain
Brain.Screen.print("Autonomous code started");
Brain.Screen.print("Turnning left");
//Turn left... Go Straight... Turn right...
Controllers
H.Screen.print("H Controller");
V.Screen.print("V Controller");
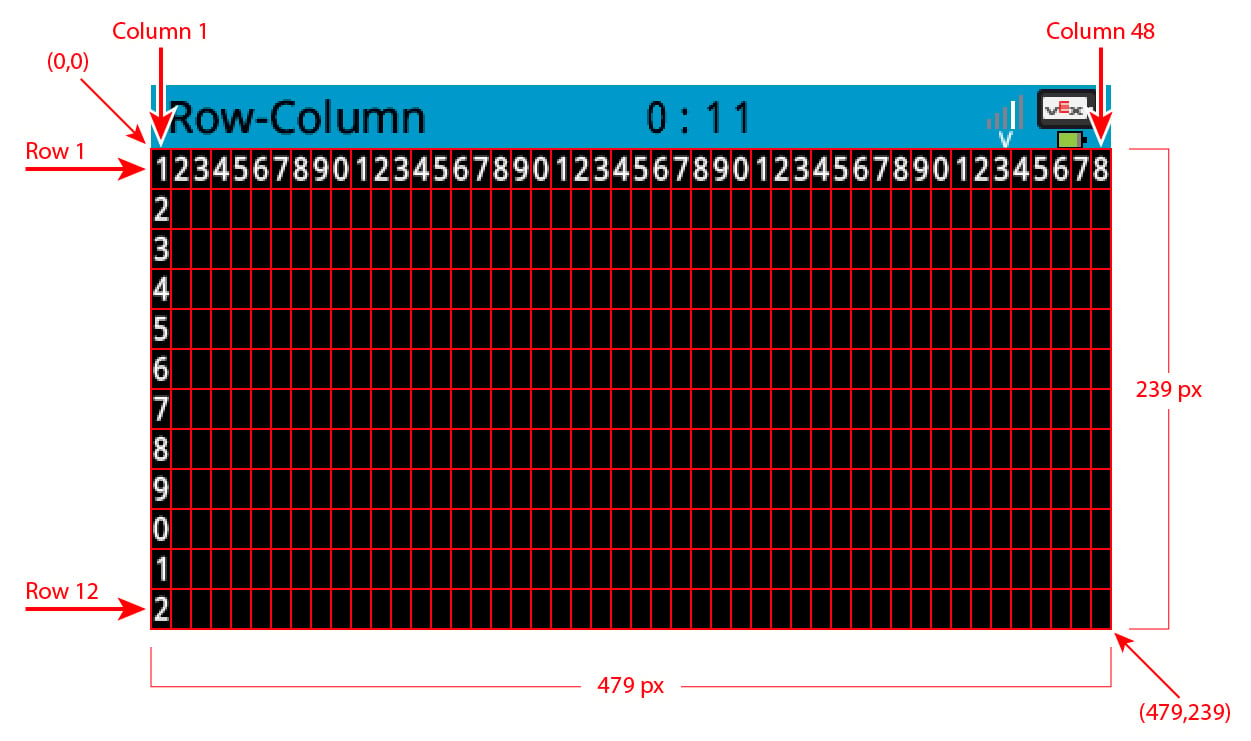
Set Cursor
Setting cursor position for printing.
Both functions for Brain and Controller below take in 2 arguments:
- Row
- As a ‘int32_t ‘ (a.k.a integer) format.
- As a ‘int32_t ‘ (a.k.a integer) format.
- Column
- As a ‘int32_t ‘ (a.k.a integer) format.
- As a ‘int32_t ‘ (a.k.a integer) format.
Brain
Brain.Screen.setCursor(1, 1);
Brain.Screen.print("Autonomous code started");
Brain.Screen.setCursor(2, 2);
Brain.Screen.print("Turnning left");
Brain.Screen.setCursor(3, 2);
Brain.Screen.print("Going Straight");
//Turn left... Go Straight... Turn right...
Below is an image from codev5.vex.com to explain the columns and rows in a Brain’s screen.
Controllers
Brain.Screen.setCursor(1, 1);
H.Screen.print("H Controller");
Brain.Screen.setCursor(2, 1);
H.Screen.print("Controller Ready");
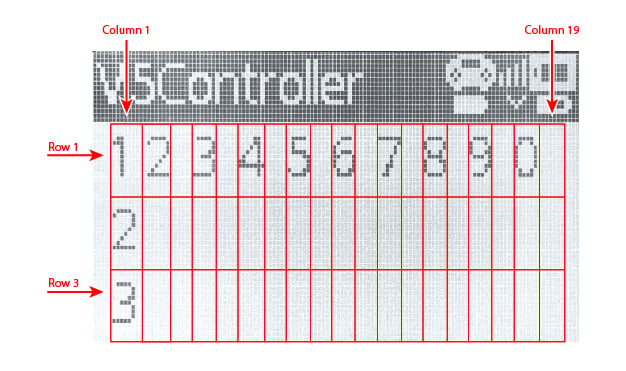
Below is an image from codev5.vex.com to explain the columns and rows in a controller screen.
New Line
Sets cursor to the next line.
Both functions below don’t take arguments.
Brain
Brain.Screen.print("Autonomous code started");
Brain.Screen.newLine();
Brain.Screen.print("Turnning left");
//Turn left... Go Straight... Turn right...
Controllers
H.Screen.print("H Controller");
Brain.Screen.newLine();
H.Screen.print("Controller Ready");
Clear Line
Clears the line/row the cursor is currently on.
Both functions below don’t take in arguments.
Brain
Brain.Screen.print("Autonomous code started");
Brain.Screen.cleatLine();
Brain.Screen.print("Turnning left");
Brain.Screen.cleatLine();
Brain.Screen.print("Going Straight");
Brain.Screen.cleatLine();
//Turn left... Go Straight... Turn right...
Controllers
H.Screen.print("H Controller");
Brain.Screen.cleatLine();
H.Screen.print("Controller Ready");
Clear Screen
Clears the screen of all printing.
Both functions below don’t take in arguments.
Brain
Brain.Screen.print("Autonomous code started");
Brain.Screen.print("Turnning left");
//Turns left... Go Straight... Turns right...
Brain.Screen.print("Autonomous complete!");
Brain.Screen.clearScreen();
Controllers
H.Screen.print("H Controller");
H.Screen.clearScreen();
H.Screen.print("Controller Ready");
Controller Input
Controller input is the most important as it allows you to control your robot based on controller inputs. Below showcases a controller and all it’s input methods.
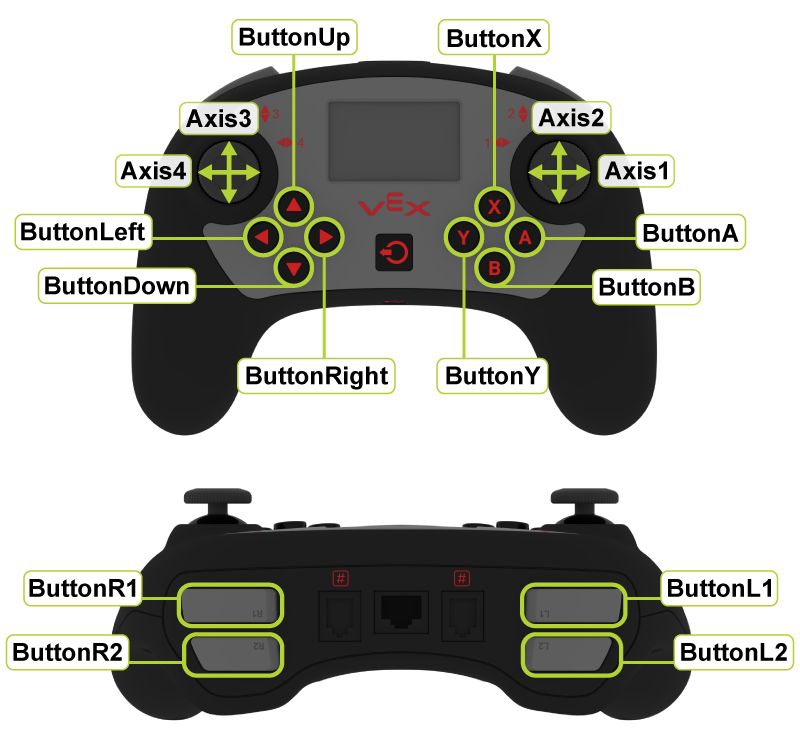 Image source:Holonomic drive train code - VEX Robotics Competition Discussion / VRC > Change Up (20/21) - VEX Forum
There are 2 main types of inputs:
- Axis (joystick)
- Button
Axis
In each controller there are 4 axis (2 joysticks). The axis range from -128 to 128. to get this value, call one the following functions based on the axis you want:
controller.Axis1.value();
controller.Axis2.value();
controller.Axis3.value();
controller.Axis4.value();
Button
In each controller there are 12 buttons (not including power button and hidden reset button):
- ButtonR1
- ButtonR2
- ButtonL1
- ButtonL2
- ButtonUp
- ButtonDown
- ButtonLeft
- ButtonRight
- ButtonB
- ButtonA
- ButtonX
- ButtonY
Based on the button that you want, you can call the following function which will return a bool (true or false):
controller.ButtonR1.pressing();
controller.ButtonR2.pressing();
controller.ButtonL1.pressing();
controller.ButtonL2.pressing();
controller.ButtonUp.pressing();
controller.ButtonDown.pressing();
controller.ButtonLeft.pressing();
controller.ButtonRight.pressing();
controller.ButtonA.pressing();
controller.ButtonB.pressing();
controller.ButtonX.pressing();
controller.ButtonY.pressing();
Controller Vibration
Controller vibration allows you to get the attention of the controller if something happened or went wrong such as motor port disconnection. You can do so using the following function:
controller.rumble('-.-');
This function takes in 1 of the following arguments:
- const char *str (A string consisting of dots and dashes to represent a rumble pattern) The table below explains the dots and dashes:
| Type | Use |
|---|---|
|
Long Rumble |
|
Short Rumble |
- predefined rumble options:
rumbleLong(Same as----)rumbleShort(Same as....)rumblePulse(Same as-.-.)
Motor Settings
When you move motors but don’t specify the settings, it relys on the default setting or the one it was set. For example if motor.stop() was called without the optional argument breakType, it will rely on the setting set by motor.setStopping().
There are many settings you can set: Below is a table of most common settings and uses:
| Setting | Use | Description | Arguements |
|---|---|---|---|
| Stopping | |
Sets the default
|
|
| Velocity | |
Sets the default
|
|
| Rotation | |
Sets the value of the motor's built-in encoder. |
|
| Reset Rotation | |
Resets the motor's built-in encoder value to 0. |
|
| Timeout | |
Sets the timeout for the motor if it does not reach its commanded position prior to the completion of the timeout. The motor will then stop. |
|
| Max Torque | |
Sets the max torque the motor is allowed to handle. |
|
Motor Data
You can get a motor’s data to calciulate turns or detect if a motor has been disconnected. Below shows a table of the data you can get and the functions you can use to get that data.
| Data | Use | Arguments | Return Type |
|---|---|---|---|
| Spinning | |
|
|
| Direction | |
|
|
| Rotation | |
|
|
| Velocity | |
|
|
| Current | |
|
|
| Power | |
|
|
| Torque | |
|
|
| Efficiency | |
|
|
| Temperature | |
|
|
Digital Out
Digital out is used for pistons in 3 wire ports.
Setting
The state of a Digital Out component can be set through digital_out.set(bool value)
It takes in 1 argument:
bool(Statetrueorfalse)
Getting Data
Getting the state of a Digital Out component can be obtain through digital_out.value()
It returns a bool (State true or false)